

How To Add A Blog To A Website With Dreamweaver
How to Use Dreamweaver to Edit Blogger Templates

Blogger is a great free service provided by Google that lets you set up your own professional-looking blog online. There are a handful of themes provided by Blogger to choose from, complete with a WYSIWYG (what you see is what you get) interface that makes editing them easy even for the non-coder. However, if you have CSS and HTML knowledge, you can do even more customization using a program like Adobe Dreamweaver.
Downloading Your Blogger Template
Once you have set up an account on Blogger.com, you will be prompted to set up your new blog.
- Enter a name for your blog, which will be the title of the blog seen on the homepage. For example, if you're writing a blog on kittens, a title could be "Bob's Kitten Blog."
- The second field you will need to fill in is the URL of the blog. Google provides free hosting, so in this example, the blog URL could be Bobskittens.blogspot.com. You do also have the option of providing a custom URL if you prefer.
- Once you have these two pieces of information entered, you will be taken to your Blogger dashboard. Scroll down the menu on the left side and choose "Theme."

- The default will be a base theme and you can scroll down to choose from the other options. When you click on a theme, a window will pop up showing you a "live" version of what your blog will look like with that theme. If you find one you like, click on the orange "Apply to Blog" button at the bottom of the screen.
- Now, look up to the upper right of your screen. Click on the "Backup/Restore" button that appears underneath your Google account icons.

- A window will pop up that says "Theme > Backup/Restore." Click on the orange "Download theme" option. The theme files will download to your computer as an XML file.

- Blogging the Bible
- How to Add Twitter to Your Blog
- How Do I Make a Podcast
Before You Get Started
If you are brand new to using CSS (Cascading Style Sheets) and HTML (HyperText Markup Language), you will need to have a good knowledge of these languages prior to editing a Blogger template using Dreamweaver.
Note that using Dreamweaver is not ideal for editing all elements of a Blogger template. Blogger has its own built-in editor to customize sites and this is a much faster method for such tasks as changing background images and adding or deleting elements. Using Dreamweaver can be faster for editing elements such as fonts, colors and other easily searchable items.
Using Adobe Dreamweaver
The process to edit Blogger templates described in this article is relevant for versions of Dreamweaver from CS4 (2008) on. Currently, Adobe Dreamweaver is part of the Adobe Creative Cloud subscription, with the version now known as "CC" which replaced CS6.
If you don't have Dreamweaver, you will need to get it via their Creative Cloud subscription service. The fees vary but average $49.99/month with discounts for students and schools, as well as bulk-pricing for multi-license purchases by businesses. The Creative Cloud subscription gives you access to all of Adobe's popular design software, including Photoshop, Illustrator, and more. Alternatively, you can purchase a single software subscription if you only want Dreamweaver for $19.99/month. If you're not sure and want to try it out, there's also a 30-day free trial option.
HTML and CSS Learning Resources
There are many free and paid resources online for those interested in learning how to understand and edit CSS and HTML files.
- W3 Schools: This site provides free information on all aspects of CSS and HTML elements and language.
- The Odin Project: Access a step-by-step learning tutorial for CSS and HTML, as well as Javascript.
- Code Academy: One of the more popular coding tutorial sites, Code Academy provides free tutorials on CSS, HTML and other coding languages.
- Free Code Camp: Another highly popular venue for students of all types of code, this site is known for its active and helpful community.
The XML File Format
The Blogger template file you will edit in Dreamweaver is known as an XML file, which stands for eXtensible Markup Language. An XML file uses similar language as an HTML and CSS file, but places all the information for both into one single file. The reason for this is that an XML file is designed to "store and transport data" and thus is the type of format you will see when backing up multiple files into one file, such as with a WordPress or Blogger site backup file.
If you know HTML and CSS, the code within the XML file will be very familiar. One important element to look out for is the Blogger tag which opens with <b:skin> and closes with </b:skin>. Inside of these tags are all the CSS styles, which are written as variables. The HTML code follows the CSS code in the file, and a Blogger template is made up of "widgets" and "sections." Blogger provides a list of these in its Help section.
An example of how variables are written would be with fonts. In the template used in this example, the main font is Damion Regular. In the theme's XML file, the code is then written as:

Setting Up Your Workspace
One of the drawbacks of using Dreamweaver to edit a Blogger template is that you will not a WYSIWYG experience. You will only be able to see the code you are editing. In order to see the changes "live," you will have to upload the file back to Blogger, or make the changes using a browser Inspect Editor function first. Therefore, it is recommended that you follow these steps first.
- Make a backup copy of the template XML file you have downloaded from Blogger so you have a clean copy in case you need to revert back to the original code.
- If you already have an active site, your blog will look strange while you are loading up changes to the template from your Dreamweaver-edited file. To solve this, set your Blogger site to private so only you can see the changes to your site while you are making them. You can do this by going into your Dashboard and selecting Settings, then Permissions, then "Blog Authors Only." Of course, if you don't mind if visitors see the changes happening, then you can skip this step!

- Another option is to create a second site that is for testing purposes and set that one to private. Once you are satisfied with the changes you have made in your testing site, you can then apply them to the template file for the "actual" blog.
Editing Your Blogger Template File
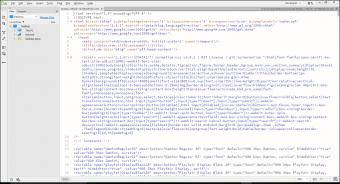
Now that you're ready to start editing, launch Adobe Dreamweaver and open the XML file you downloaded from Blogger. When you open the file in Dreamweaver, you will see all the XML code in the editor.
- Using your browser's Inspect Editor with the live blog, hover over the item you want to change to find the correct element. You can also scroll through the code, but if you are searching for an element that is mentioned many times with different parameters (e.g., font), using the Inspect Editor may be quicker.
- For example, to change the font type for the main title, use the Inspect Editor to see that it is Robot 45px.

- Go into Dreamweaver and using the Find function (Ctrl+F, F3, or using the menu, Find - Find in Current Document) look for "roboto." In this example, the variable for this particular instance of the font is on line 23.

- To change this font to a serif version such as Roboto Slab, the code would be edited in line 23 to say:
<Variable name="robotoBold45" description="Roboto Slab Bold 45" type="font" default="bold 45px Roboto Slab, serif" hideEditor="true" value="bold 45px Roboto Slab, serif" /> - You also would then scroll to that element, which can be found on lines 75 to 78 here, and change the value in line 78 to "bold 45px Roboto Slab, serif".

- When you are done, save the file, go to your Blogger Dashboard, and choose the "Theme" option in the menu. Click on the "Backup/Restore" button and this time choose the second button that says "Choose File." Find the newly edited XML file on your computer. Click on it and then click on the orange "Upload" button in the pop-up window.
- Wait for the file to upload. When it is complete, the pop-up window will close and you will return to the Theme area of the dashboard. Now, if you view your live blog, you will see that the header font has changed to Roboto Slab. You can see the change in the Inspect Editor as well.

- Follow the same steps to edit other items, such as font, colors, and any items your knowledge and skill with HTML and CSS allow!
Finding Blogger Templates
Your Blogger account comes with some templates pre-installed, but it's not a deep selection. You can find more templates on other sites like the following.
- BT Templates: This site contains free templates in a variety of styles for use with Blogger. You can submit your templates as well for others to use.
- Deluxe Templates: Find hundreds of free Blogger templates with an easy-to-use search feature to find just the right look.
- Colorlib: 30 of the best free responsive Blogger templates are available here, each with helpful descriptions of its benefits.
- My Blogger Themes: This Blogger theme gallery has free themes arranged by design style, topic and features.
- DesignCrazed: This regularly updated, curated list of the best free Blogger templates has detailed information on each template, plus the ability to view a demo and download the template.
- Our Blog Templates: In addition to over 170+ free templates for Blogger, this site also features some CSS design tutorials.
- Blogger Templates: The site has four pages with some unique themed templates created by a Blogger user.
Customizing Your Blog
If you're ready to get online and develop your blogging presence, it's as easy as creating a Blogger account and setting up your template. With Adobe Dreamweaver, there's a myriad of free templates you can customize with some simple steps, an understanding of CSS and HTML, and your own personal design inspiration!
© 2021 LoveToKnow Media. All rights reserved.
How To Add A Blog To A Website With Dreamweaver
Source: https://socialnetworking.lovetoknow.com/How_to_Use_Dreamweaver_to_Edit_Blogger_Template
Posted by: godinthemot.blogspot.com
0 Response to "How To Add A Blog To A Website With Dreamweaver"
Post a Comment